
How to Make a Raised Garden Bed with Paver Edging
How to Make a Raised Garden Bed with Paver Edging
 How to Make a Raised Garden Bed with Paver Edging & Vegetable Planters
Thank you to WD-40 Company for sponsoring this video.
WD-40 Trigger Pro & Specialist Rust Remover Soak available at Wal-Mart
🎥 What to Watch Next:
Making Under Deck Storage with Skirting – https://youtu.be/AaQmgYYv5tQ
How to Restain a Deck – https://youtu.be/jBXnfLe3lzs
Restoring an Old Wooden Playset – https://youtu.be/D8b2R7reusw
➤Join the Builders Club!!! http://bit.ly/2abkaSV
More content, early access, FREE plans, video credits
➤Support the FTBT Channel:
Buy FTBT Woodworking Plans: http://bit.ly/2fL5NGp
Buy FTBT Merch: https://bit.ly/2YgiHnd
Links to My Tools & Gear: http://bit.ly/FTBT-tools
Subscribe: http://bit.ly/FTBT-youtube
➤Thank you to these partners for supporting my channel. Go check them out!
Woodcraft: http://bit.ly/2qP7JIs
Kreg Tool: https://amzn.to/2FXZIGp
ISOtunes: http://bit.ly/2Ru4Es8 ($10 off code: FTBT)
TimberlandPRO: https://bit.ly/2Zm1r1n
➤Plans from this build:
Modular Garage Cabinets bundle (Save 30%) – https://fixthisbuildthat.com/garagecabinets
➤Tools/Supplies Used (affiliate):
🟡 WD40 Trigger Pro – Available at Wal-Mart
🟡 WD40 Specialist Rust Remover Soak – Available at Wal-Mart
ISOtunes Bluetooth Hearing Protection – http://bit.ly/2Ru4Es8 ($10 off code: FTBT)
Vigoro Raised Planter Beds – http://thd.co/3wlktTr
Vigoro Garden Soil – http://thd.co/3bEF9Om
Vigoro River Pebbles – http://bit.ly/3bGTNon
Vigoro Weed Control Fabric – http://bit.ly/3fqWqvq
Paver Stone – http://bit.ly/3f5xPh6
Paver Sand – http://bit.ly/3bJnoh4
8” Tamper – http://bit.ly/3hJXUUq
7 cu/ft Gorilla Cart – http://bit.ly/2RzBMBp
Wet Tile Saw – http://bit.ly/340pxAB
16 x 16 Pavers – http://bit.ly/340jsnN
Paver Edging – http://bit.ly/3vi9eeF
4’ Level – http://bit.ly/2RC13Lj
String Line – http://bit.ly/33Yc6Ba
Stakes – https://bit.ly/2T1jTfb
➤FOLLOW ME on Social Media:
Instagram – http://www.instagram.com/fixthisbuildthat
Facebook – http://www.fb.com/ibuildthat
Twitter – http://www.twitter.com/fixthisbuildtht
Pinterest – http://www.pinterest.com/fixthisbuildtht
➤Referenced people/videos:
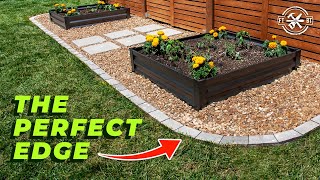
Installing paver edging in a garden or around a raised garden bed is a great way to define your outdoor space. Raised planters in the garden add a place for us to grow vegetables this summer as well. Using a pavers to make easy access into the under deck storage is a great way to define the space as well. This is an outdoor DIY project we’ve been wanting to do for years!
Music Licensed through Epidemic Sound – Get a FREE month: https://bit.ly/3qCwWiW


Your work looks great. Thanks for the video. It was very helpful.
If you’re wondering, the marigolds are a look good deterrent for pests like squirrels and chipmunks.
Can I just use sand without the paving base of stones ? Or its absolutely necessary ?
not a fan of putting plastic in nature, not cool😔😔😔
What an AMAZIng job!!! You worked so hard! I know because, I do my own landscaping and it is hard work, but you LOVE it.
hi
I had a deck like yours at my old house. I called it the Damn Deck! It required annual staining and power washing to look good. When you’re ready to do another staining project you should investigate metal spindles in stead of 2x2s. It will help A LOT to speed up the project.
nice to see your video dear
when cutting with a chisel always go all the way around the stone to get a cleaner cut, what you saw here was just the top side of the brick and the fracture point was just on the top of the brick hence why it cut badly
My issue is the digging. When you’re disabled, it just doesn’t happen. 😞 can i just put everything on top without digging?
Hola, very beautiful 😍
Tip to make this quicker.
Grab your edger, and cut your line with that, and then run your edger acrosss the area a few times, making 1′ squares, so it is a lot easier to dig the sod up.
personally seems like alot of work and the rocks dont look better than nice grass. I would have simply place rocks about the nice planters and allowed the grass to remain in place.
Note: you can use plain 6% vinegar for cleaning rust instead of using alot of chemicals.
what are you using to mark the paver? Ive tried chaulk, pencil, crayon, paint, etc and when i use the wet saw it still washes off
Something else to add is 1/4" metal mesh cut to the size of the planters and placed in bottom before the growing mixture. This keeps rodents like moles and chipmunks from burrowing from below. Just sayin. Good job though. 👍
Did you consider Brock Paver Base En lieu of the 5 inches of stone?
When using a bolster chisel to cut bricks you need to mark/cut all the way round the brick not just one side that way it will usually break evenly. In addition lay the brick to be cut one something firm but relatively soft so there is a bit of give so as not to break the brick too soon, . I use a bunch of newspapers wrapped in gaffa tape. Works a treat. 🙂
Great job incorporating your sponsor, I actually watched the advert with interest.
Oh yeah at throwing that stick laughing at that
Ugh. The idea of digging up the weeds just discourages me. Here in Missouri, every inch of soil has rocks. We have no dirt, only rocks. Oh well…
Beautiful
Very well done!!! This is exactly what we’ve been looking to do. This project was on point! TY both for sharing your life together and what appears to be fun doing so.
Beautiful!
When cutting curve in the pavers. Place the number of pavers you think you will need for the curve (e.g. 5). Then you know for a 90 degree bend the 5 bricks each needs an 18 degree angle. Little trigonometry since you know the angle and width of a brick (Tan(angle) X width of brick = your cut distance). So for 18 degree angle and 100mm wide brick means you cut from one corner of the brick to 32.5mm from the other corner. All 5 bricks together will equal a perfect 90 degree curve. You don’t actually need to cut both bricks, but if you wanted to then 32.5mm/2= 16.2mm for each brick
Question: What happens with the water that comes from the roof through the drain tube? It seemed to have run directly into the pavers which I would think will cause a backup during a heavy rain.
Check out my other Outdoor Projects!
How to Restain a Deck: https://youtu.be/jBXnfLe3lzs
Upgraded Deck Skirting with Storage: https://youtu.be/AaQmgYYv5tQ
what did you do with the excavated dirt ?
How does this look a year later
Do you have a video on how you made the metal planters?
Looks really good. great work and the tips about the Wd 40
Oh, to be young again !!!!!!!!
Watched and appreciated this vid a couple of times. Question about the sound track you used in this video. There is reference to Epidemic Sound but do you have more info on the track that starts at 5:57? Cheers.
Very nice 😀
Super helpful! And in a way that makes a very beginner landscaper/gardener like me feel a bit more confident in undertaking similar projects. Im very curious, overall how much time did this take you? And how much did you end up spending?
Living in the suburbs and working nearly all week makes it difficult to see more of my dream projects through, esp with time and money, but Im determined to see it through this year! Or at least to start. Thanks for the video!
Hi, thanks for the video. Where did you get those raised metal planters??
Great Job
Just use cardboard vs putting plastic down
Looks very nice! I think I can follow your directions pretty well and get similar results. Thanks for the idea.
it was right around the 10 minute mark I realized I’m in way over my head😂
Love the Shawshank redemption reference.
Interesting. You show people how to do things wrong…and not just a little wrong, totally wrong. Your paver project will be out of whack in no time. I do applaud you for all your hard work; but, as you say in your videos, you tend to work harder, not smarter. You truly need to do more research into how to do these first-time projects the right way before you send half a million followers of yours down the wrong path of frustration and wasted time and money.
What happens to the weed control fabric eventually? Does it disintegrate?
Why did that drain pipe go no where lol
In the middle of making something like this, only using your video. Thank you !
Where did you get that raised bed?
Mi piace moltissimo!!! 🥰👍
Lol! Because using a tape measure is way to hard
Couldn’t you have used a sod cutter ??
It would help your daffodils bloom if you dug up the bulbs every couple of years and replant some. The bulbs were getting to crowded